This is not a strategy guide. Strategy involves the setting goals and priorities, and deciding where and when to attack and defend, as well as what units to buy. There are plenty of articles written already about the strategies for various maps in TripleA. This handbook seeks only to describe the tactical tools one can use to achieve those goals and priorities that are essential to strategy. Some of the scenarios described below may not be realistic during actual gameplay and are contrived for illustration purposes only. All screenshots are from “Pact of Steel” or “World War II Revised” (also known as WW2v2).
Setting Objectives
Every move and decision made should be made with clear objectives in mind—moves without clear objectives are unnecessary and will cost you valuable tempo. In TripleA, tactical decision-making essentially boils down to two categories: where and how to attack, and where and how to defend. In order to better make these decisions, an understanding of the purpose of attack and defense is needed.
The Objectives of Attack
A player may attack for any one or combination of the following reasons:
Taking production. Each territory captured has a production value which contributes to your income at the end of that turn. If this is the sole objective of an attack you’re considering, then only a simple risk-benefit analysis is needed to determine whether the territory is worth the potential casualties you’ll suffer in battle.
Destroying enemy units. Often, a player does not care about the worthless production value of a territory at all and seeks only to annihilate an army located on that territory, to cripple and weaken the enemy. In this case, whether or not the attacker successfully captures the territory is irrelevant, as long as the enemy army is destroyed or nearly destroyed. Usually, a player does this when he can be sure of a favorable kill-to-casualty ratio so that he will have dealt more damage to the enemy than what he suffers himself.

Fig. 1. The Japanese player decides to attack Persia with the entirety of his Indian army. He has no interest in Persia itself—he only wants to destroy the British tanks there. In this battle, the Japanese player can be very certain of a favorable kill-to-casualty ratio. The British have only 1 infantry with the army so any casualties taken after the first one will eat directly into their stack of tanks. The Japanese, on the other hand, have plenty of cheap infantry fodder to absorb casualties and can easily destroy the expensive British tanks at a low cost. Most likely, the Japanese will be able to destroy the British 1 infantry and 6 tanks at a cost of perhaps 5 or 6 infantry—a very good deal! If the Russian player has a large stack to attack Persia if Japan were to win, Japan can retreat back to India after one or two rounds, having dealt Britain a crippling blow, perhaps leaving Britain with only 1-2 tanks at a cost of only a couple infantry.

Fig. 2. The German player has made a terrible blunder by landing his 2 bombers in Norway without sufficient defense. The Allies now have a very strong incentive to attack and destroy the expensive German bombers. The bombers defend at only 1 and are sitting ducks to any land, aerial, or amphibious attack.
Alternatively, a player with more resources and production may choose to throw attacks at the enemy regardless of the kill-to-casualty ratio in an effort to wear down the enemy, relying on the fact that they can afford to replace their losses but their opponent cannot. This is the equivalent of the real-world human wave attack.
Area control. This refers not to the physical possession of a territory, but the ability to project influence over an area. A player who gains control over an area gains the initiative and the ability to make a wide range of tactical and strategic choices, giving him the power to maneuver the enemy and fight battles on his own terms.
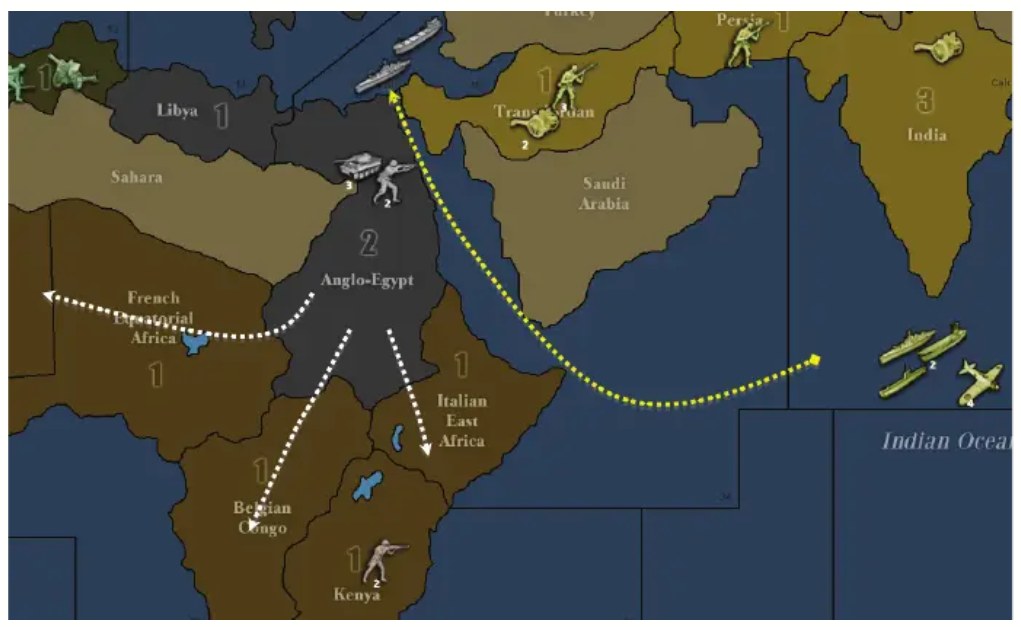
Fig. 3. Germany has just captured Anglo-Egypt. Germany has seized the initiative by gaining two great types of area control: 1) Control of the Suez Canal, which allows the Japanese fleet off the coast of India to join the German fleet in the 2) Mediterranean. 2) Access to the lightlydefended interior of Africa, which Germany can quickly capture with its tanks 3) and infantry at no cost.
Area denial. Taking control of an area means the enemy correspondingly loses control there and is forced on the defensive. The enemy loses tactical flexibility and options and is forced to respond to your actions instead of taking initiative of his own.
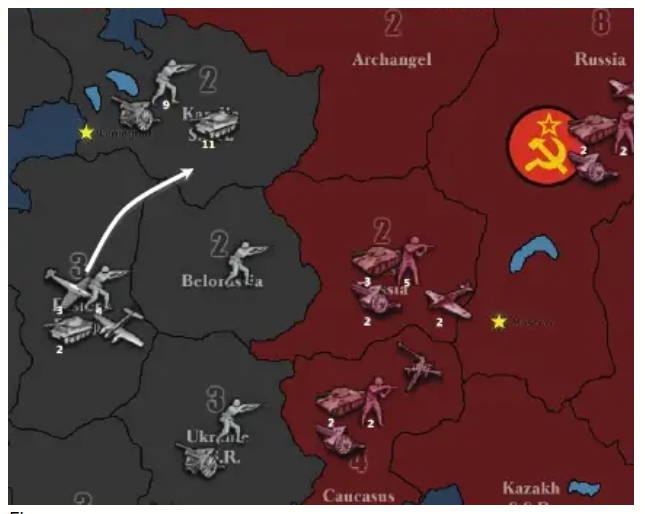
Fig. 4. Germany has just seized Karelia with a large army and now stands facing a weaker Russian army in West Russia. Even if Russia counterattacked Karelia with everything that can reach it, he has almost no chance of destroying the stack of 11 German panzers and will suffer unacceptable casualties. If the Russian army stays in West Russia, it risks being annihilated on Germany’s next turn when Germany can bring to bear an overwhelming force of 11 infantry, 2 artillery, 13 tanks, 3 fighters and a bomber against West Russia. Russia has lost control of the area and is forced to retreat to either Caucasus or Russia or else suffer crushing defeat. Since the German move to Karelia denied Russia the ability to safely field any significant armies in the area, Germany can now trade and maneuver Archangel and West Russia at his leisure.
Diversion. Often, diversionary tactics are needed to draw attention away from a hard-pressed ally or a collapsing front. These include amphibious landings and unexpected attacks along the periphery. Sometimes, an actual diversion is not needed—just the threat of a diversion suffices. For example, the threat of a D-Day invasion posed by a looming Anglo-American fleet in the Atlantic is often enough to cause the German player to divert units from the Eastern Front to defend France.
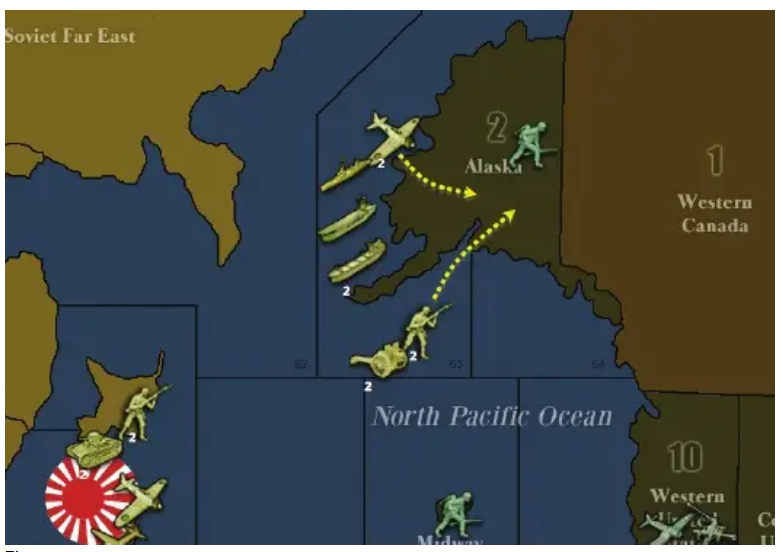
Fig. 5. Japan makes a diversionary landing in Alaska to draw American attention away from Germany.
The Objectives of Defense
There is a symmetry between the objectives of attack and those of defense. A player’s defensive tactics may be influenced by any one or combination of the following reasons:
-
Denying production.
-
Wearing down the enemy.
Area control. Like seizing area control, holding on to critical control of an area is the most common motivation for mounting a defense.
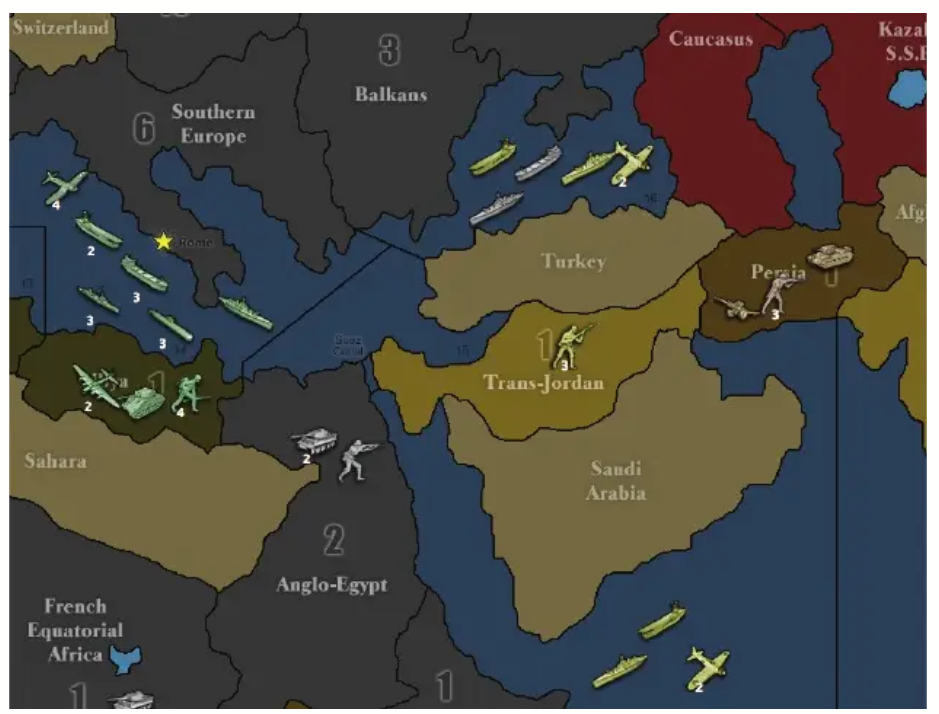
Fig. 6. The Axis have a strong incentive to vigorously defend both Anglo-Egypt and Trans-Jordan to keep the Suez open so their two fleets can combine. Otherwise, the American fleet off the coast of Southern Europe can annihilate the Axis fleets piecemeal.
Area denial.
Bait. Sometimes, a player may deliberately leave an area weakly defended or intentionally provide an inviting target in order to induce the enemy to attack. This can either be a diversion of sorts, to draw the enemy away from a critical theater, or a bait leading to a trap.

Fig. 7. The American player has landed an expensive bomber in weakly defended Hawaii, presenting a juicy target highly vulnerable to amphibious assault. The US is hoping that this will entice Japan to commit transports and fighters from off the coast of Japan into Hawaii. If Japan commits fighters, he will also need to send his carrier into the sea around Hawaii to pick up the planes. Lots of American ships and planes lurk on the West Coast, waiting to crush the Japanese fleet should he fall for the trap.
Tactical Concepts
Concentration of force. This one is pretty intuitive—you want to be able to concentrate your strength at one point in order to make breakthroughs, win critical battles, and hold important ground. While you don’t need to concentrate your firepower for every single move you make (that would probably be disastrous), you should always keep in mind the iron rule: A concentrated force is always stronger than the sum of its parts. This rule applies to your opponents as well, so you should look for ways to prevent the enemy from concentrating his forces in order to have them defeated in detail.
The more powerful the army you bring to battle, the lower its casualties will be. This is because if it takes a few rounds of dicerolling to kill all enemy units, then the enemy would have had a few rounds of combat to fire back at you. If you overwhelm the enemy and wipe them out in just one dice roll, then they will have had only one chance to fire back, inflicting fewer casualties on your army. The longer a dice battle goes on, the more rounds the dice battle has, the more casualties the defender will inflict on the attacker.
Cannon fodder. Battle entails casualties, and you will always need cheap, expendable units to absorb hits, or else you will lose your more expensive and valuable units. On land this means infantry, at sea this means transports or submarines (or submarines and destroyers in newer maps). Providing sufficient infantry cover is essential to both offense and defense, so never forget to purchase enough infantry. Let’s revisit the situation in Figure 1. The Japanese in India would have had a far more difficult time trying to destroy the British army in Persia if the British had more infantry as cannon fodder to absorb hits, thus allowing their more powerful tanks to survive and strike back heavily against the invading army. In Figure 2, Germany could have easily deterred any small-scale raid against their Norwegian bombers by sending some infantry cover. Any Allied effort to destroy German bombers covered by, say, 5 infantry would require far more commitment of resources. Often, battles of annihilation are fought because the attacker believes he has enough of an infantry advantage to out-fodder the enemy.
Counterattack. For every attack you make, you should consider whether the enemy has the ability to counterattack and destroy your survivors on his turn. Likewise, you often want to have the ability to make a swift and crushing counterattack in order to discourage the enemy from making any deep penetrating moves.
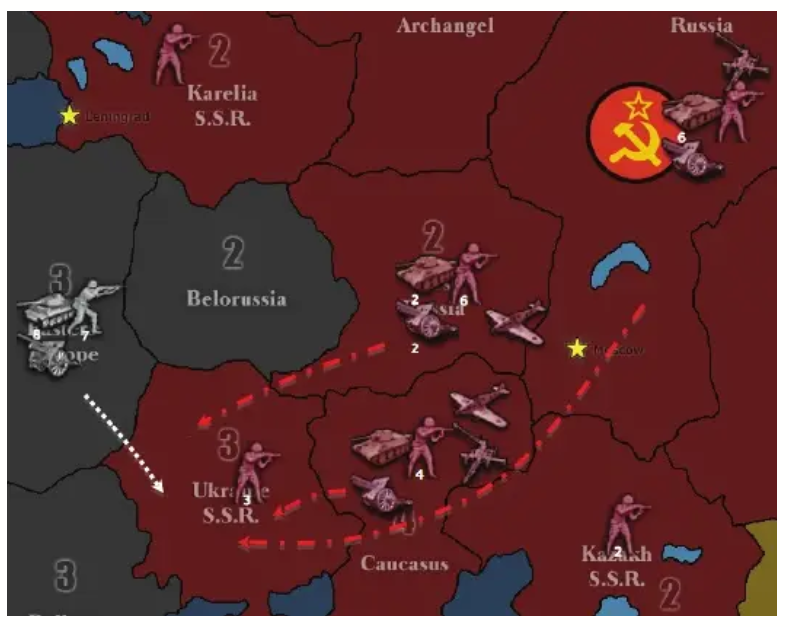
Fig. 8. Germany is trying to decide whether or not to attack Ukraine with his entire army in Eastern Europe (white), thus putting great pressure on Caucasus. He can take Ukraine without a problem and expect 1-2 casualties, but realizes that his army, once moved to Ukraine, could be subject to devastating Russian counterattack (red). The Russians have the ability to attack Germany’s army in Ukraine with 10 infantry, 3 artillery, 9 tanks, and 2 fighters, which is an overwhelming force that will probably destroy the German army. Unwilling to take the risk, Germany decides to take Ukraine with only the minimum force needed, rather than moving his entire army to Ukraine.
Blocking. Tanks and naval units move 2 spaces at a time, and “blocking” refers to using expendable fodder units such as infantry or submarines to slow or limit their movement.
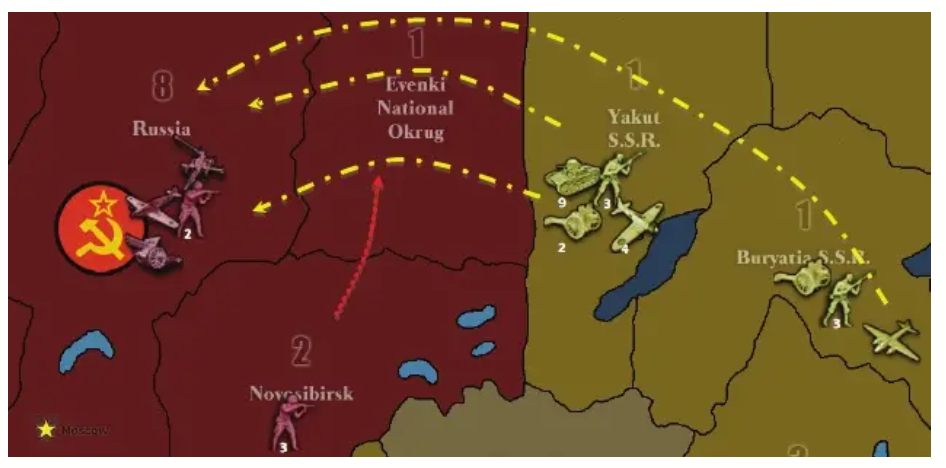
Fig. 9. It is Russia’s turn and he is facing a serious situation. The Japanese build-up in the eastern Soviet Union has reached a culminating point and Japan is about to push hard for Moscow. Russia is going to build 6 infantry and 2 artillery in Russia, but Japan still has very good odds of capturing Moscow by blitzing to Russia with his 9 tanks supported by 4 fighters and a bomber (yellow). Russia can send 1 infantry from Novosibirsk to Evenki as a sacrificial roadblock to prevent the tank blitz (red), thus buying time for 1 more round of building and preparation for the final showdown.
Active defense. This category of defensive actions involve the seizing of ground or using aggressive attacks as a means of defense, and includes airfield denial, block attacks, and strafing. This is contrasted with passive defense, which involves hunkering down with lots of units and waiting for the big battle.
Airfield denial. Air units need places to land, but can only land on territory that has been in possession for a full turn— presumably this rule simulates the time it takes to construct airfields. By capturing potential landing spots, a player can deny enemy air units areas over which they can operate.
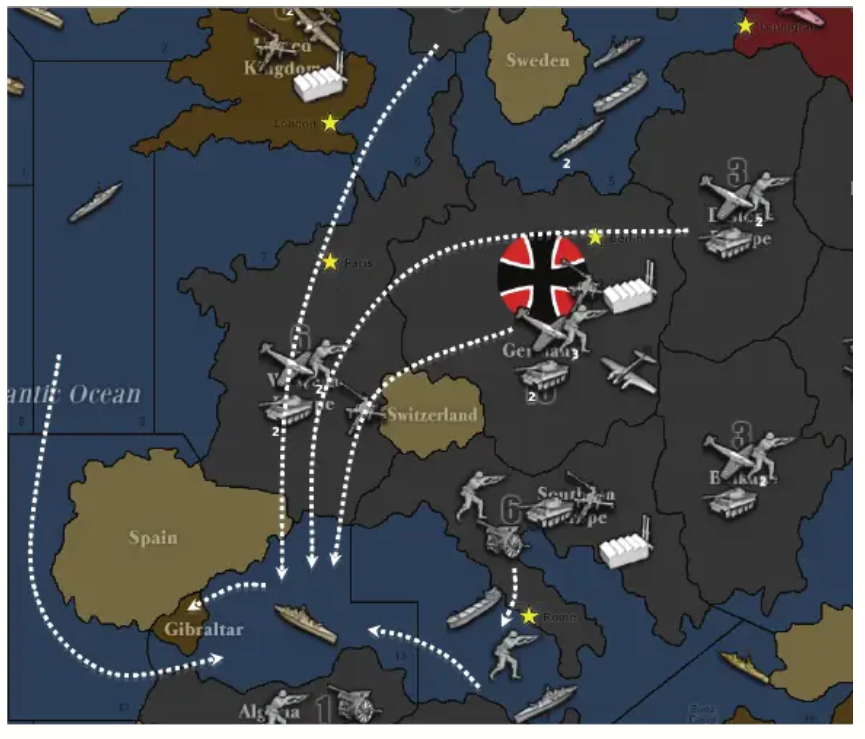
Fig. 10. A common German opening involves killing the British battleship in Sea Zone 13 with the Atlantic submarine, Italian battleship, and 4 or 5 fighters from all over Europe, coupled with the landing of an infantry on Gibraltar in order to protect the German ships from British counterattack. If the Germans do not seize Gibraltar, then the British could make an aerial attack on the weak German fleet gathered at Sea Zone 13 with 2 fighters and a bomber based in London. With the capture of Gibraltar, such attack is not feasible because the London fighters will have no place to land—and sending just the bomber would be suicide.
Aerial block attack. Often, it is not possible to simply send a fodder unit as a roadblock—the territory you wish to block is occupied by enemy troops. If you still wish to set up a block, you need to attack with sufficient force to kill the enemy units and still have enough survivors to block the space. Sending tanks and artillery along with infantry into a blocking battle is often a poor choice because the remaining units will be destroyed in the enemy’s counterattack, and the whole point of blocking is to conserve your forces, not let them be defeated in detail. This is where the air force comes in handy, because air units provide offensive firepower but fly back to land behind the front lines instead of remaining exposed to counterattack. Two fighters and two infantry do the same work as two tanks and two infantry, except that unlike tanks, they will not be sacrificed as blocking fodder. Fighters and bombers are therefore essential to capturing territory with economy of force.
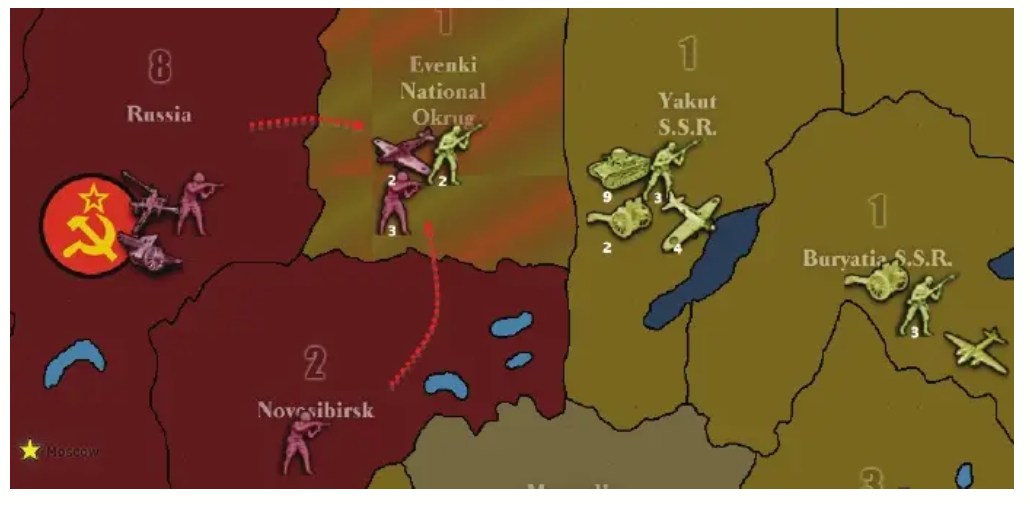
Fig. 11. Russia faces a similar situation as in Fig. 8, except Evenki is occupied by 2 Japanese infantry. Russia sends 2 fighters and 3 infantry to capture and block Evenki. In battle, one Russian infantry is killed and the remaining 2 stay in Evenki to block the Japanese blitz. The Russian planes fly back and land in the safety of Moscow.
Trading. Often, two players do not want to commit large forces against each other and are content to take turns making blocking attacks against each other, trading territory back and forth. Trading serves the dual purpose of blocking enemy movement and capturing territory production, and is a form of attritional warfare. Trading usually favors the player with the superior air force which can launch more aerial blocking sorties. Since fighters cannot land on newly captured territory (presumably to simulate the time it takes to prepare airfields), trading also serves the purpose of denying the enemy forward air bases from which to operate.
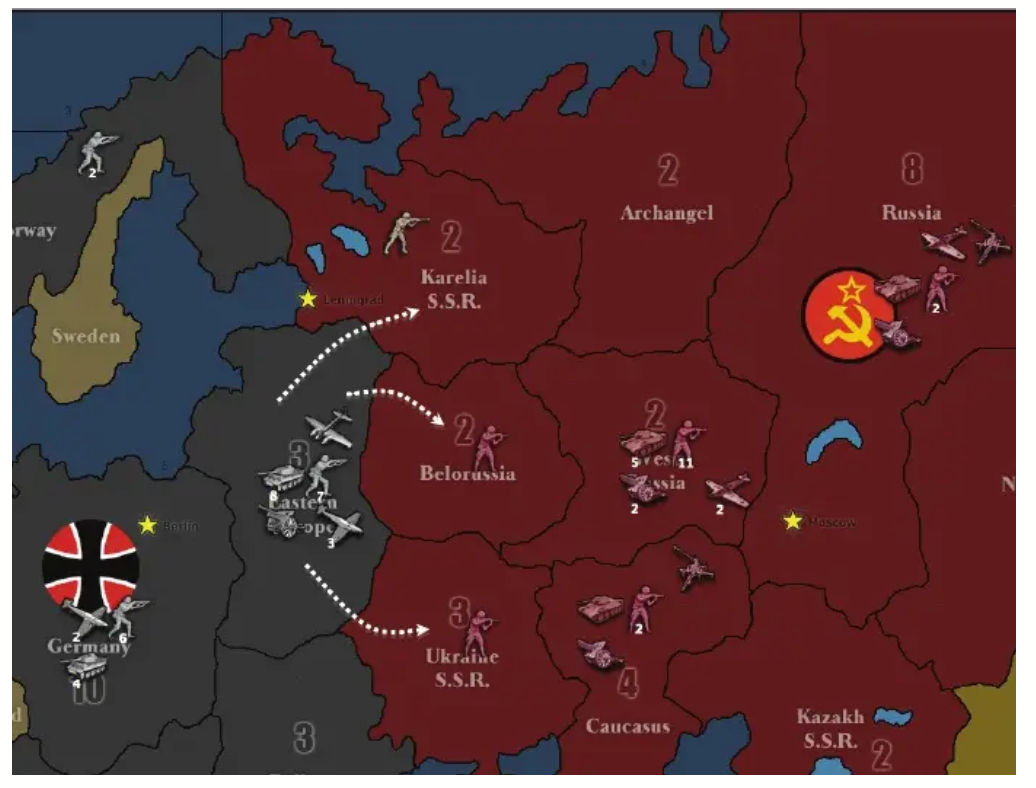
Fig. 12. Situations like this one is common for the Eastern Front and features Germany and Russia trading territory with each other. In this situation, Russia has just blocked Belorussia and Ukraine, with the UK helping block Karelia. Germany will then launch aerial blocking attacks against those territories, and the process repeats until one side cannot keep up with the rate of attrition or becomes distracted by a second front. Infantry/artillery coordination. Each artillery unit has the ability to boost one infantry unit’s attack from 1 to 2. The presence of a few artillery pieces in an infantry mass is an extremely cheap way to boost offensive power—for the additional 1 IPC you spend on purchasing an artillery instead of an infantry, you are essentially purchasing 2 attack points: 1 for the artillery, which attacks at 2, and 1 for an infantry the artillery supports, which also attacks at 2. Bringing artillery into battle is highly effective weapon that should be used all the time. However, for greatest effect, you should always start battles with more infantry than artillery, to ensure that killing your infantry fodder will not decrease the supporting effects of artillery. For example, let’s say you fight a battle with 10 infantry and 5 artillery. The 5 artillery and 5 of the infantry attack at 2, and the 5 remaining infantry attack at 1. As long as the casualties you accumulate do not exceed your fodder of 5 infantry, you will get to keep rolling 5 artillery and 5 infantry at 2 for several rounds of combat.
Strafing. Sometimes, a player does not wish to occupy a territory, and seeks only to slaughter enemy units at a favorable killto-casualty ratio. Strafing is when a player attacks only to fire once or twice before retreating from battle. This sort of hit-andrun tactic is particularly effective when you have achieved concentration of force but the enemy has not, so you are able to inflict defeat in detail.
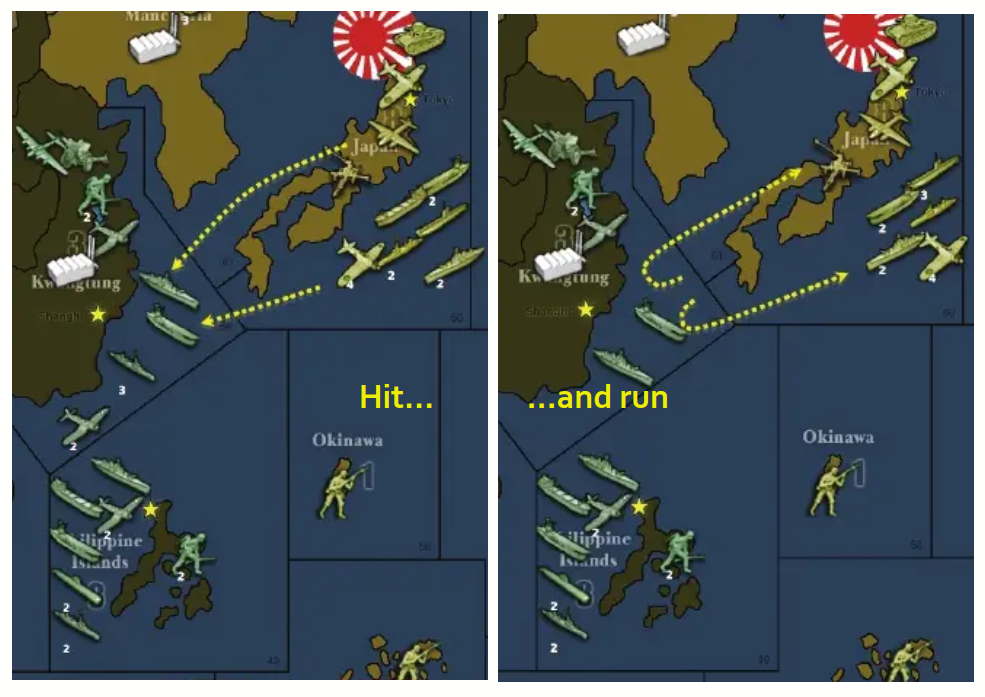
Fig. 13. Hit … and run. It is Japan’s turn, and the US has gathered an impressive navy and poised to wipe out the Imperial Japanese fleet and begin invading the home islands. On the Americans’ turn, they can concentrate an overwhelming force of planes and ships against the Japanese fleet and will annihilate it for sure. However, the situation is not as hopeless as it seems—the Americans are not concentrated yet, so this provides the Japanese with a window of opportunity to conduct a hit-and-run strafe to weaken the Americans and defend the home islands. The Japanese attack the American fleet in Sea Zone 59 with everything they’ve got (2 battleships, 2 destroyers, 2 aircraft carriers, 5 fighters, 1 bomber, 1 submarine, 1 transport). In the first round of combat, the Japanese score 6 hits; the Americans absorb one hit with their battleship and kill off 3 destroyers and 2 fighters. The Americans fire back and score 4 hits; the Japanese absorb 2 with their 2 battleships, and sacrifice the transport and a destroyer. After one round of combat, the Japanese happily retreat back to where they came from. They have killed 5 American units worth a total of 56 IPC at the cost of 2 units worth 20 IPC. In addition, the Japanese builds 2 submarines to reinforce their fleet, and the Americans have lost their overwhelming advantage and the chance to easily wipe out the Japanese fleet. Note that this tactic counted on the fact that the Japanese fleet did not wipe out the American fleet during the first round of combat. If the Japanese had rolled any luckier and wiped out the Americans completely, they would not have been able to fall back and get reinforced by their submarine build.
Aerial strafing. Air units are ideal for strafe attacks since they do not stay to exposed to counterattack regardless of whether they win the battle or not, and instead fly back to fight another day. Naval powers like UK, Japan, and USA can build up a powerful naval-air combined force that can terrorize enemy shores and slaughter exposed enemy units.
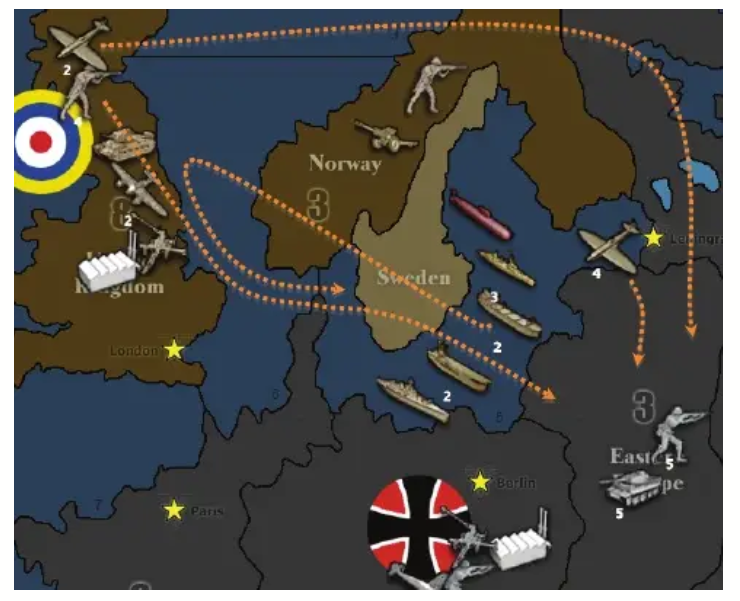
Fig. 14. The German player did not pay attention to British airpower and is about to suffer heavily for it. Britain sends all 6 fighters and 2 bombers he has into Eastern Europe, and has his transports pick up 4 infantry from the UK to drop off into Eastern Europe as well, to serve as fodder. In battle, the British battleship in the Baltic misses the naval bombardment hit, but the combined infantry-aerial force inflicts 6 casualties on the Germans—5 infantry and a tank. The Germans strike back and roll 3 hits against the British infantry. At this point, the British player has only 1 infantry fodder left and does not want to risk losing any of his fighters in a second round of combat, so he withdraws all his planes and leaves his remaining infantry to die. The luckless infantry misses his shot and gets killed by a German tank. However, Britain has reason to be content—he had just killed 5 German infantry and 1 German tank at the cost of 4 British infantry. While this may not be an impressively large kill ratio, keep in mind that Germany was probably depending on his Eastern Europe army to serve on the front lines against Russia and has just been placed in a position of considerable disadvantage—Britain’s losses were replaceable, Germany’s was not. The continual bleeding of German forces will eventually lead to collapse.
Tactical Reserves. Players can take advantage of the mobility of tanks and planes by holding them in reserve as an attacking or counterattacking strike force that can be committed to one of several places instead of putting them on the front lines. The presence of reserve forces is also a psychological tool to make your opponent act with caution.
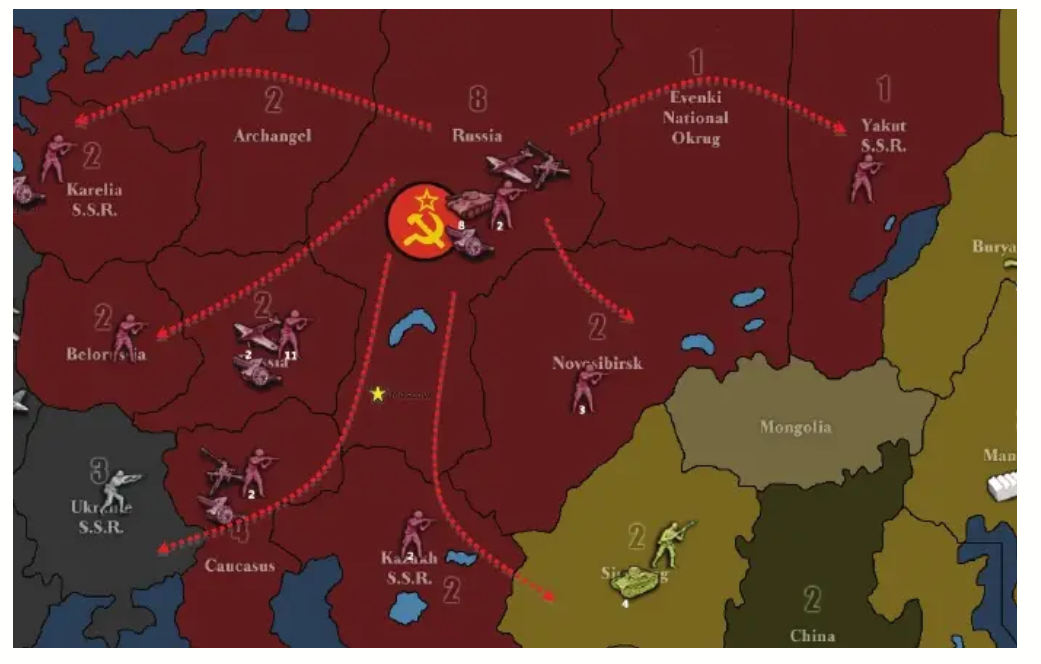
Fig. 15. Russia is holding 8 tanks in reserve in Moscow instead of putting them on the front lines. This gives him lots of flexibility and the ability to respond to a wide range of threats. These tanks can serve to counterattack any Japanese incursions in Yakut, Novosibirsk or Kazakh, any German incursions in Karelia or Caucasus, or to make a move into Ukraine. Using tank reserves that can be committed to multiple places depending on enemy moves enhances Russia’s ability to fight and respond to a two-front war. Lines of communication. Analogous to real-life warfare, lines of communication in TripleA refers to the path between your industrial centers (factories) and the front lines. The further you push into enemy territory, the longer your lines of communication will be and the more strained your logistics. A longer line of communication means a longer delay in being able to respond to changing front-line conditions. In other words, the longer the distance between your factories and the front lines, the longer the time it takes for your builds to take effect on the battlefield. For example, if you suddenly realize you are running out of infantry cover on the front, it will take a while for your newly-built infantry to arrive and correct the situation.
Defense in Depth. Also analogous to real-life warfare, defense in depth refers to the trading of space for time, retreating to husband your resources while sapping the momentum of your opponent, in order to shorten your line of communications while straining those of the enemy. The goal of defense in depth is to allow the enemy to penetrate deeply into your territory and then hopefully annihilate the invading army with a strong counterattack. Having tank and plane reserves are often essential components of this tactic.
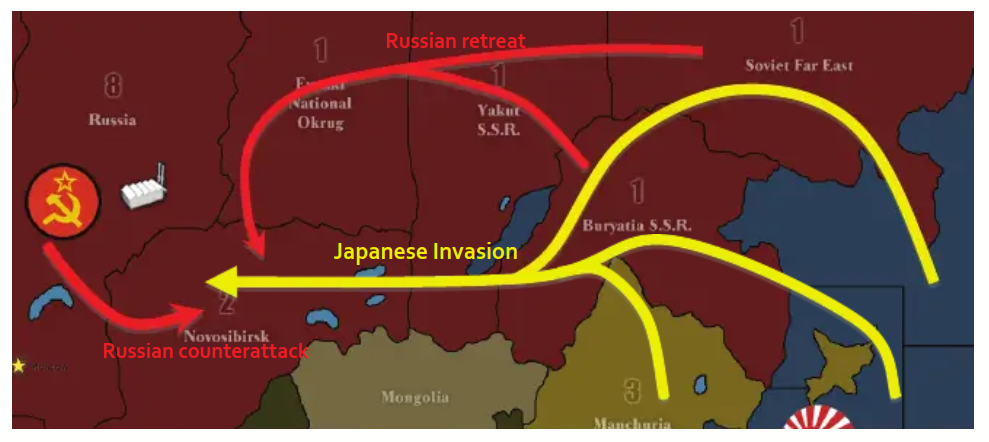
Fig. 16. Russians conduct defense in depth.
A country like Russia has plenty of space to trade and sometimes finds it effective to retreat its main forces to the factories, where they can be reinforced with builds and carry out counterattacks.
Forward retreat. This is a neat trick takes advantage of the combat retreating rules in order to make units go where they normally will not be able to reach.
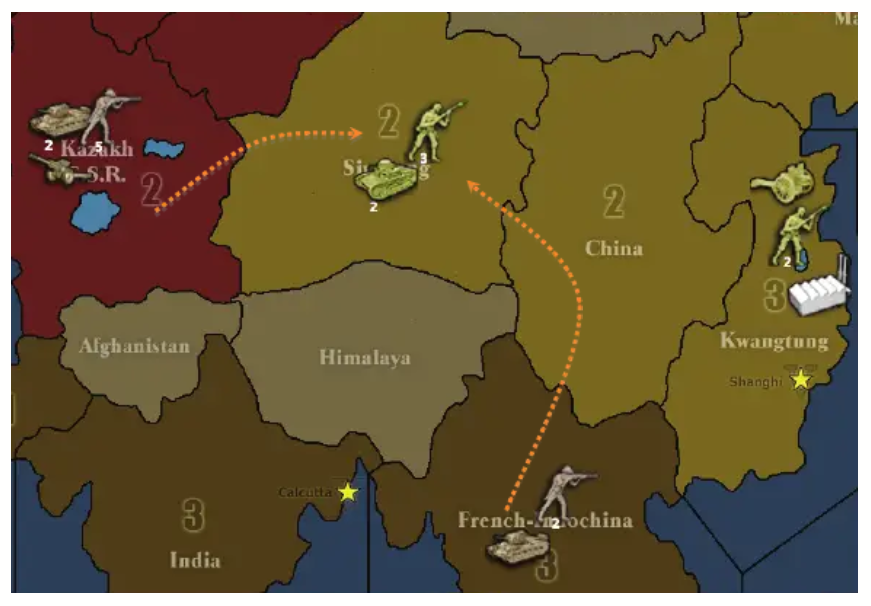
Fig. 17. The British attack Sinkiang with their army in Kazakh, and their tank in French Indo-China joins the battle as well. After 1 round of battle, the British kill 3 Japanese infantry and takes 2 infantry casualties and retreats all units to China. He is able to do this because one tank attacked from the direction of China and combat retreats can occur to wherever any attacking units come from.
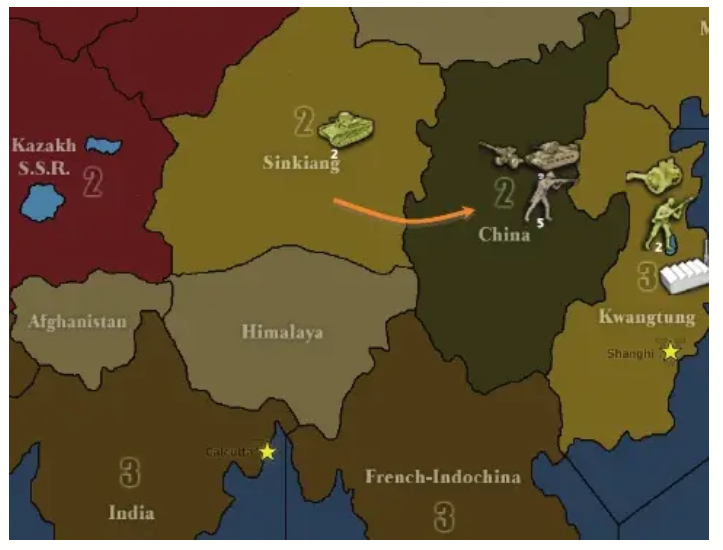
Fig. 18. The result of the forward retreat.
Submarine warfare. Subs are tricky units because they can slip though hostile seas, but enemy ships (except other subs) can’t slip though a sea blocked by a sub (in some newer maps, subs do not block other sea units). This makes subs very effective blocking units, and combined with their ability to submerge, means that they don’t have to be sacrificed if they get lucky rolls. Subs also make great cheap defense against an enemy carrier-centered fleet, because the subs’ sneak-attack targets exclusively ships and can sink the carriers upon which enemy planes depend for landing.
Anti-submarine warfare. Air units can hit submarines, but submarines cannot fire at planes, making air units the ideal riskfree anti-submarine weapon. If the aerial sub-hunters miss their shots, however, the submarines can get away by submerging, so sometimes players like to bring a destroyer along as well, to prevent subs from diving. (in some newer maps, a destroyertype unit is required to join the battle in order for your air units to hit submarine units)
Escorting. Transport ships have nearly no defenses against being attacked at sea or from the air, and it is essential to protect them with ship escorts that can deter air or submarine raids. Nobody wants to turn a ferry service into a turkey shoot.
Fleet-in-being. A fleet-in-being is a fleet that stays in port, preserving its strength and integrity by avoiding direct battle, instead relying on its very existence to project influence over the seas. A fleet that engages in a large battle runs the risk of suffering crushing defeat which will permanently grant the opponent the upper hand. A fleet-in-being, on the other hand, by preserving its existence, can serve as a form of deterrent to influence enemy actions and forces the opponent to act with caution. Fleets-in-being are usually used by the weaker side who cannot afford to replace their expensive naval losses should they risk battle. The German Kaiserliche Marine during WWI was a historical example of a fleet-in-being in practice, since the German naval command was unwilling to risk their fleet in major battle and thus avoided defeat by the British Royal Navy. In TripleA, a fleet-in-being is a useful tool of deterrence for denying the enemy the ability to scatter its forces, limiting their ability to maneuver.
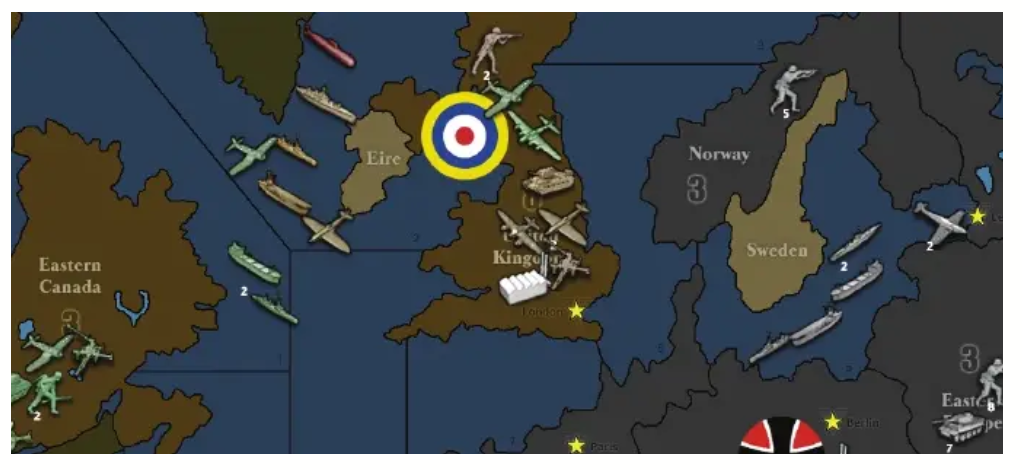
Fig. 19. The German Baltic fleet, by avoiding being destroyed in battle, can deter the Allies away from Sea Zones 3, 6, and 7 for at least a few rounds. However, the German fleet-in-being can only last for so long before the Allies build up an overwhelming superiority and decide to destroy it once and for all.
Alternatively, the fleet-in-being concept can also be applied on land as armies-in-being by weaker powers who wish to preserve their threat-posing capability in order to maneuver the enemy.
Thank you for Reading, and for playing TripleA