TripleA Rule Book
The World’s Foremost Open-Source Grand Strategy Game
![]()
Table of Contents
- Overview
- Game Setup
- The Game Screen
- The Map
- Capitals
- The Units
- Units Used in “Big World : 1942”
- Sequence of Play
- Technology Development
- Purchase
- Combat Movement
- Battle
- Non-Combat Movement
- Placement
- End-Turn
- Winning the Game
- The Undo Feature
- Low Luck vs. Dice
- The Battle Calculator
- Menus & Tabs

TripleA is a turn-based strategy game and board game engine. Though TripleA comes with many games inside, it
is just an engine for playing games, and is not a game itself. TripleA started out as a World War II simulation, but
has since expanded to include different conflicts, as well as variations and mods of popular games and maps (a
‘map’ is like a board, while a ‘game’ is a specific setup on a map/board).
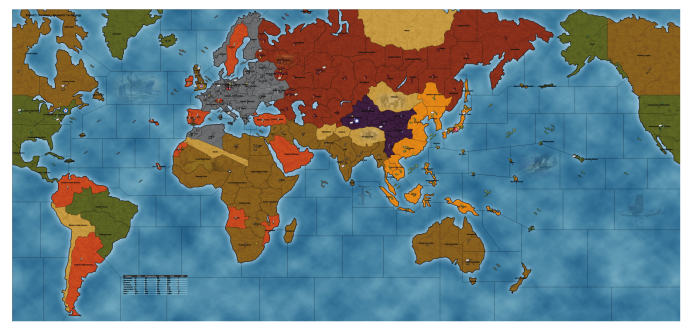
This manual describes how to use and play TripleA, using the game “Big World : 1942”, a basic variant. The two
most popular WWII maps for beginners are “Pact of Steel” and “Big World”, and Big World has a lot more
territories and a one more unit type than Pact of Steel, while the rules are almost exactly the same. Other TripleA
games and variants can still use this manual as a good starting point, because the game engine and most of the
concepts are the same no matter what map or conflict you are playing.
This manual does not attempt to describe 100% of the game functions. There are just too many things that the
game can do to make that practical. Some of the game interfaces and operations are intended for developers.
Many of the game operations simply happen automatically, and illegal player actions are prevented. A certain
amount of knowledge and initiative is expected of the player, especially to read any game notes for any maps.
However, all of the critical and important game operations and knowledge are described in this manual.

The first thing that happens when TripleA is started is that the game setup window appears. There are a number of choices that the player must make at this time.
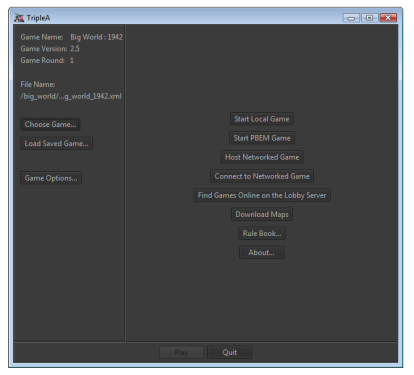
- The game variant must be selected, OR a saved-game must be loaded.
- Approximately 10 or more variants are automatically included with the game, and more can be downloaded.
- The game options should be set, but the default ones could be used.
- A local, pbem, or network game can be started, OR you can join the online lobby instead. (Even if loading a savegame, you must still select ‘start local game’ or ‘start pbem game’ or ‘host networked game’)
- Each player can be set to be a human or an AI.
A few other options are also available at this time, but they can be ignored for now.

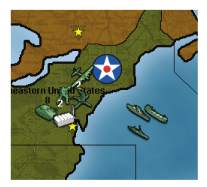
Below is a screenshot taken while in-game, playing the “Big World : 1942” map.

Usually, the main screen cannot display the whole world at once, and instead only shows part of the map. The part that is displayed can be rapidly moved or changed in three ways:
- By moving the cursor to just inside the edge or corner of the main map window, at which point the map will scroll in that direction. Scrolling the mouse wheel will also scroll the map up and down.
- By ‘right-clicking’ on the main screen and dragging your mouse to move around the map.
- By clicking or clicking and dragging on the minimap in the upper right-hand corner.
In addition, you can change the Zoom Level of the map by either going to the “View” menu and selecting “Zoom”, or by holding down the “ALT” key while scrolling your mouse wheel.

Each TripleA map is divided into a number of areas. Land areas are called territories. Sea areas are called sea
zones. Short or narrow rivers and small islands generally play only a cosmetic role (if an area has no name when
you scroll your mouse over it, then it is just cosmetic and not an actual territory or sea zone). Air units fly over top
of all this, but need to land at the end of every turn.
Each map area is adjacent to a certain number of other areas. Units move about the map, from one area to an
adjacent area; as a general rule, teleportation does not exist.
Land units are restricted to land territories unless they are being carried by transports. Sea units are restricted to
sea zones. This means that land and sea units generally cannot attack each other.
Sea units can generally move to any adjacent sea zones, but there is one exception to this rule: Canals. Canals are
connected sea zones that require ownership of attached land territories in order to pass through. For example, at
the Suez Canal, sea units can move north and south via the canal, but only if the land territories on both sides of
the canal are controlled by friendly or allied nations at the beginning of your turn.
Each territory has a production value (Production Units, or PUs for short), which could be as low as zero. It is
possible for sea zones to be assigned production values as well, in which case they would be called ‘convoy
centers’. The production value of a land territory determines how many units can be produced there per turn,
but, primarily it determines how much income that territory provides per turn to the player controlling it.
Each land territory is always controlled by some player, except for some territories that are initially neutral or are
impassible to all players. A territory can change hands if an enemy land unit conquers and occupies it. Some land
units, such as Anti-Aircraft guns (AA Guns), cannot attack and conquer a territory. The color of the territory on
the map indicates who controls it.
The player who controls a particular territory receives the income from it at the end of that player’s turn. Control
of a territory may change many times in a game round, and the territory will still produce its full income with each
change of control.
Certain territories contain “Factory” units, which allow the controlling player to produce units in that territory. A
territory with a factory may produce a number of units up to the production value of the territory, if the player
owned that territory at the beginning of their turn. When a player conquers a territory containing a Factory or AA
Gun, those units will be captured with the territory, and the conquering player may use them on their next turn.
The territories that a player starts the game with are considered to be “originally” owned by that player, unless
otherwise specified. If an ally ever recaptures such a territory, control of the territory (and its resources and
capture-able units) will revert to the original owner. In this case, the income for the territory is not collected by
the capturing player, and instead it will be collected by their ally, the original owner, at the end of their turn,
Provided that they still own it at that time. Of course, enemy players are not bound by such considerations and
control whatever they capture.

Each of the nations in TripleA has a capital territory. These territories are indicated on the map by a large roundel or flag associated with that nation.
If an enemy player captures one of these territories, there are drastic consequences.
- All of the production units (PUs) in the victim’s bank are immediately transferred to the treasury of the capturing player.
- The victim does not collect any income while the capital is in enemy hands.
- The victim cannot produce any units while the capital is in enemy hands. Of course, he has no resources to produce those units in any case.

As most games on TripleA are “grand strategy” games, a “unit” does not represent a single infantry or tank, but
instead represents an entire army that is based around infantry or tanks. Therefore an “infantry” unit would
include within it its own logistics train, supplies, anti-air/tank weapons, etc. Unless specified, all units can hit all
other units.
Each TripleA unit has certain properties, which are expressed as a set of numbers. These properties are Attack
(Att), Defense (Def), Movement (Move), Cost (PUs), Hit-Points, Size, and maybe some special properties or
abilities.
- Attack is the firepower when a unit is attacking. The unit gets one hit by rolling that number or less on a 6-sided die.
- Defense is the firepower when a unit is defending. The unit gets one hit by rolling that number or less on a 6sided die.
- Movement is the number of map territories or sea zones that the unit can move each turn (except when being carried by a transport). A unit with a Movement of 1 can move to one adjacent area, and so forth.
- Cost is how many PUs must be spent to produce one of that unit.
- Size indicates how much transport or carrier capacity is required to move a land or air unit by sea.
- Hit-Points indicates how many hits this unit must suffer before it dies. Almost all units in TripleA have only 1
hitpoint, meaning that they die after the first hit. Some special units, like Battleships, may have 2 hitpoints, which
allows them to absorb enemy fire, and possibly repair if they survive the battle.
Important special properties and abilities are things such as being able to Blitz, or being able to increase the attack power of another unit when they are in the same territory (called giving and receiving “support”), or being able to shoot at aircraft as they fly over, or being able to produce units.

The following units and stats are particular to the game “Big World : 1942”, and therefore if you try playing a different map, the units might differ slightly. For example, “Pact of Steel” has no “Cruisers” and the “Destroyers” cost more and have higher attack and defense. In some maps not based on World War II, the units may differ radically. For example, “Lord of the Rings: Middle Earth” has completely different units, different art, and different stats.

Special Abilities:
- Infantry may receive support. This means when they are paired with Artillery units on a 1-to-1 basis, the infantry units will receive +1 attack power.
Notes: Infantry is generally slow and cheap with a high defense. Accordingly, its primary missions are to defend territories and to absorb casualties. Despite their lower attack and defense, they still have just as many hitpoints as more expensive units, so it is very good to keep more infantry than any other unit.

Special Abilities:
- Artillery may give support. So as an example, if you had 3 infantry and 2 artillery, then 2 of the infantry would receive support and have their attacks increased to 2, while the 3rd infantry would stay at 1 attack. The support is not cumulative, so 1 infantry with 2 artillery would only receive 1 support.
Notes: Artillery is used to increase the attacking effectiveness of your infantry stacks. It is generally good to have a few artillery with every large stack of infantry, as it is a very cost effective way of increasing the firepower of your army.

Special Abilities: Armour has the ability to “Blitz” through empty enemy territories. This means that while normally units must stop in the first enemy territory they enter, armour has the ability to keep moving if the enemy territory is empty of enemy units. The blitzing unit conquers this territory, and then can continue moving, going deeper into enemy territory or even returning to friendly territory. Notes: Armour is used for rapidly attacking an enemy, and being able to respond quickly to opportunities that are too far away for infantry to reach in time.

Special Abilities: All air units in TripleA share 2 abilities: Air units cannot end the turn in a land territory which was fought over or conquered this turn. In other words, they must move out of the territory where they fought, and land in a territory that was friendly at the beginning of the turn, or on a friendly carrier which has space left.
Air units cannot capture territories. Fighters can land on Aircraft Carriers. Notes: Fighters are used for their flexibility in having 4 movement, and because they can attack both land and naval targets. While all land units lose their movement when they participate in a battle, air units can continue moving after a battle is finished, giving them the ability to get out of harm’s way in case the enemy does a counter-attack.

Special Abilities: In addition to normal air abilities, Bombers have the ability to do a “Strategic Bombing Raid” on any enemy factory. Generally speaking, each bomber that survives any AA shots will get to roll a 6 sided die, and do that much damage to the enemy’s PU supply or to the individual factory (however the total damage per bomber cannot exceed the PU value of the territory). Notes: The additional movement and attack, as well as the ability to raid enemy factories, make bombers a deadly but expensive unit.

Special Abilities: Transports have the ability to carry land units. They can carry 1 infantry unit plus 1 more land unit of any kind (e.g. 2 infantry units, or 1 infantry and 1 artillery / armour / AA Gun.
In “Big World : 1942” and many other maps, Transports may be taken as casualties like any other unit. However, in some maps, Transports may not be taken as casualties until all combat ships are dead. Notes: Transports are used for moving land units over the sea zones.

Special Abilities: Submarines may “submerge” at the end of a round of battle, which effectively retreats them out of a battle but keeps them in the same sea zone. Submarines may move through enemy sea units, if the enemy units do not include a “Destroyer” unit. Submarines always attack at the beginning of each combat round. If the enemy has no “Destroyers” present, any casualties the submarines inflict do not get to shoot back. Submarines may not attack air units, ever. Air units may attack Submarines though. Notes: Submarines are stealth units, and one of the cheapest units at sea, and are very useful in attacking enemy sea units and for use as cannon fodder during sea battles.

Special Abilities: Destroyers have the ability to cancel all of the abilities of enemy submarines. Notes: Destroyers are also one of the cheapest units at sea, and are better at defending since they can defend against air units. It is good to have destroyers whenever the enemy has submarines.

Special Abilities: Cruisers have no special abilities on “Big World : 1942”, however on other maps they often have the ability to bombard an enemy ground position. Notes: A middle-cost sea unit.

Special Abilities: Carriers have the ability to carry 2 friendly (owned or allied) fighters over the ocean. These fighters will help defend your fleet, and can be used to attack enemy positions out of range. Notes: Carriers are useful only in their ability to hold fighters. Since fighters are more cost effective than most naval units, they add greatly to your fleet’s abilities. (Technically, the carrier does not “carry” the fighters, unless it is an allied fighter as cargo, it merely provided a landing place for the fighters at the end
of the player’s turn. When the player’s turn starts, all owned fighters are considered to have launched from the carrier and are now in the air, so fighters and carriers move independently of each other.)

Special Abilities: Battleships have 2 hitpoints. If damaged in battle but still alive after the battle ends, all battleships will repair to full health after the battle is over. Battleships can bombard enemy land territories, if there is a transport unloading ground troops from the same sea zone into an amphibious assault on that land territory. So, if there is an amphibious assault, the battleship may roll a single die at 4 before the battle begins in order to try to cause an enemy casualty. Notes: Battleships are used both for their ability to absorb and repair hits, and to bombard enemy territories.

Special Abilities: AA Guns have a special ability that activates before a battle or strategic bombing raid begins, and when air flies over a territory containing an AA Gun. They will roll a single die at 1, for each attacking aircraft in the battle. Any air that is hit immediately dies, with no chance to fire back. AA Guns do not participate in battle, and if the attacker wins, the AA Gun is captured by the attacker. AA Guns may not move during combat movement, they may only move during the non-combat move phase. They may never be on the attacking side of a battle, only on the defending side. Notes: Anti-Aircraft Guns are used to defend against Strategic Bombing Raids, and are also used to make an attacker think twice before they use overwhelming air power to attack your territories.

Special Abilities: Factories allow their owner to produce units in the territory the factory is located in (or in the Sea Zone adjacent to the factory). The Factory will allow production of any number of units, up to the Production value of the territory it is in. Having multiple factories in a territory does not increase this limit. Factories do not participate in combat, and if an attacker conquers the territory they will automatically capture any factories in the territory. Factories can be targeted in Strategic Bombing Raids. Notes: Factories are vital centers of production, allowing their owner to produce units in that location.

TripleA is played in a series of rounds, with each round composed of a series of player turns, and each player turn composed of a series of phases (also called steps).
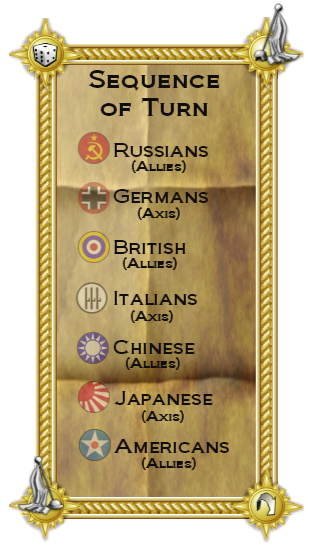
The sequence of turns for Big World: 1942 is:
- Russians (Allies)
- Germans (Axis)
- British (Allies)
- Chinese (Allies)
- Japanese (Axis)
- Americans (Allies)
Once the Americans finish their entire turn, the current “round” is over. TripleA then checks for victory conditions to determine if one side has won the game or not. If no side has won, then the next round starts, beginning with the Russians again.
The standard sequence of phases is:
- Technology Development
- Purchase
- Combat Move
- Battle (resolving combat)
- Non-Combat Move
- Placement
- End of Turn (accounting)
A player may choose to do nothing in certain phases, and, depending on the circumstances, some phases may not occur. Almost all phases require the user to press a “Done” button on the right side of the screen in order to progress to the next phase.

In the Technology Development Phase, a player may spend production units (PUs) to attempt to acquire new
technologies. This involves purchasing die rolls, and generally for every 5 PUs spent, 1 additional die is purchased
(a 1/6 chance each). The player then chooses which technology they wish to roll for, and then all of the dice are
rolled. If one or multiple 6’s are rolled, the technology is discovered and all dice are discarded. If no 6’s are
rolled, then nothing happens and the dice are discarded as well (in some maps, they player keeps the dice and
may roll during their next turn).
Technology generally improves a player’s units, or allows production of advanced units. Generally any
technologies discovered are then activated at the end of the player’s turn (though in some maps, the technologies
are activated right after they are discovered).
PUs not spent in this phase are saved for later use, like in the Purchase Units phase.
Available Technologies
Once activated, Technology in “Big World : 1942” provides the following benefits. In other maps, different technology may be available, or the same technology as below but with slightly different results (like ‘Jet Power’ increasing attack power instead of defense power). Technologies only affect the player who discovered the technology, and do not affect any other players.
- Jet Power: Each Fighter’s defense power is increased by 1.
- Super Subs: Each Submarine’s attack power is increased by 1.
- Long Range Aircraft: Adds 2 to all aircraft range.
- Rockets: Your AA Guns gain the ability to launch rockets: At the end of your combat move phase, each of your AA Guns may attack enemy factories within 3 movement away from the AA Gun. Generally each enemy factory can be targeted by only one rocket, and rockets may only target one factory. The damage is a single 6 sided die, but limited to the production value of the target territory, and the victim immediately loses that number of PUs (or in some maps, the factory will be damaged instead).
- Destroyer Bombard: Each of your Destroyers may conduct shore bombardment.
- Heavy Bomber: Each of your bombers rolls 2 dice when attacking and raiding (if ‘LHTR’ rules is turned on, then only the better result is used. If not, then both dice count.)
- Industrial Technology: All of your units cost one PU less. (Industrial Tech is considered an ‘optional technology’ and both players must agree to allow this tech before the game starts, otherwise it should not be researched.)
For all of the technologies, except Destroyer Bombard and Industrial Technology, the units will visually change to have new icons.
Some technologies available on other maps, but NOT available on “Big World : 1942”, are:
- Advanced Artillery: Each artillery provided double the number of support (i.e.: supports up to 2 infantry instead of 1).
- Paratroopers: Bombers may now transport a single infantry into combat. Neither bomber or infantry can move before the infantry loads. The movement must be to a battle, and movement ends in the first enemy territory reached.
- Increased Factory Production: Factories in territories valued 3 or greater may produce 2 additional units. In addition, repairing is done at half price.
- War Bonds: At the end of your turn, roll 1 die and collect that much income.
- Mechanized Infantry: Each armour may transport a single infantry with it as it moves.
- Improved Shipyards: Naval units are cheaper to purchase.
- Radar: AA Guns now fire at +1 attack (2 instead of 1).

In the Purchase Phase, a player may spend PUs to purchase new units. These units may be placed on the map in the Unit Placement Phase at the end of the turn.
At the start of the Production Phase, a menu appears offering the current player the chance to produce new units. Any combination of available units may be purchased, subject only to the limitation that the total cost does not exceed the available PUs. Any PUs not spent in this phase are saved for later use and accumulate without limit. The unit purchase menu choices are to add or remove one unit of a given type, or to buy as many as possible or zero of a given type. You may also enter a specific number with your keyboard. The unit purchase menu may be closed and restored multiple times during the Purchase Phase and changes can be made freely, all without penalty.
If a player attempts to purchase more units than can actually be placed on the map, the game provides a warning and lets the player change their purchase choice, but the player is not actually prevented from doing so if they insist.
In some newer maps, you may also repair damaged factories and units during this step. A factory that is damaged produces less units (1 unit fewer for each point of damage), and so they must be repaired by a certain amount in order to produce all the units you wish to purchase.

In the Combat Movement Phase, the current player may move any or all of his units to the full limit of their movement allowance, with certain exceptions.
- Certain units, such as AA Guns, may not move in this phase, as they can only move in the Non-CombatMovement Phase.
- Air units may not move so far that their remaining movement allowance is insufficient for them to return to an eligible landing area – that is, air units generally may not commit suicide in this manner. The program does not always properly calculate ranges for fighters moving over large bodies of water; it assumes that nearby carriers will move to pick up the fighters. A player could abuse this to circumvent the “no suicide” rule. However, it is the player’s responsibility to ensure that each of his air units can possibly land at the end of this turn.
- Land and sea units (except submarines if no enemy destroyer is present) must stop moving as soon as they enter an area occupied by an enemy or neutral unit, or a neutral territory. Most land units having a movement allowance greater than one may move through an empty territory controlled by an opposing player without being required to stop, capturing that territory as they go. This is called “blitzing”. Neutral territories normally cannot be blitzed.
Only in this phase may units enter into any form of combat situation. If a player moves units into a territory or sea zone owned by the enemy, or containing enemy units, then the units must stop and participate in a battle during the next phase. Unlike games such as “Risk”, you may not make a combat movement, then conduct combat, then make more movement and conduct more combat. In TripleA, all movement to attack an enemy must be made at once, during this phase, and after this phase is over all combat will be completed at the same time. After this phase is finished, there will be no more movement to attack enemies allowed, until the player’s next turn.
At the end of this phase, combat must be resolved for each territory or sea zone in which the current player has at least one unit and an enemy player or neutral has at least one unit. Units that do not use up their full movement allowance in this phase retain the remainder for the Non-Combat Movement Phase, except for land and sea units that engage in combat. Land and Sea units that engage in combat lose their remaining movement points.
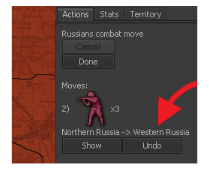
Illegal moves are not permitted. If a move is attempted with a group of units that is illegal for some of those units, a warning is given, and only the legal parts of the move will execute. For some complex moves, further input is required, and the player will be asked to provide it. As the movement phase progresses, a list of all moves made so far is displayed on the right side of the screen. Any one of these moves can be cancelled and undone at any point until the player manually ends the phase, except that moves that are prerequisites for other moves cannot be cancelled without cancelling the dependent moves first.
Transports
Certain sea units (transports) may transport land units. A typical transport can carry one foot infantry and one more unit, although this may be different on other maps.
The procedure is that a land unit moves onto a transport in an adjacent sea zone and later moves onto a territory adjacent to the transport. The transport may move at any point in this process. The land unit may unload on the same turn or later, and may remain on the transport indefinitely. Land units may load onto one transport from different territories and at different times, but a transport may only unload to one territory per player turn, and if it unloads, it may not move any more in that player turn. Land units may not move before they load onto a transport.
Transportation may also occur with units of allied players, although the process is not as seamless as when the transported units belong to the same player as the transport. This is because when you move a unit onto a transport you own, you may unload that unit on the same turn. But when you move a unit onto an ally’s transports, that unit may not unload until the next turn.
Carriers and Fighters
At the beginning of the turn, all of the current player’s owned fighters launch from any carrier they were on. They are considered to be in the air, not on board a carrier. This means that when you are moving the carrier, the air units do not move with it. Carriers cannot be used to give air units ‘extra’ movement. All owned air units stay in the air until the end of the current player’s turn. The only exception is that allied air units remain on-board a carrier, and do not launch. These air units are considered to be “cargo” and do not participate in attacks. If the carrier dies, the allied air “cargo” will die too.
How to Select and Move Units
- To pick up a unit, left-click on that unit. Then move your mouse to the territory where you want the unit to go, and left-click again to move it there.
- Do NOT left click and drag your mouse at the same time. Instead you have to click, then move the mouse, then click again.
- To de-select the last unit selected, right-click. To deselect a specific unit, right-click on that unit’s stack.
- In addition to these basic methods, there are some more shortcuts
- CTRL-Left click on a unit stack to select all units in the stack.
- CTRL-Right click on a unit stack to de-select all units in the stack.
- Shift-Left click on a unit to select all units in the territory.
- CTRL-Right click somewhere not on a unit stack to de-select all units. Or hit ESC to deselect all.
- Left click in the territory, but not on any unit, to bring up a menu allowing detailed selection of multiple units.

In the Battle Phase, each territory or sea zone where both the player has units, and any enemy has units, will create a “battle” that must be resolved. A list of these territories and sea zones will appear on the right side of the screen. The current player may resolve these in any order he wishes, but there are some exceptions, such as amphibious invasions and strategic bombing raids, which must be done first, but all battles must be resolved during this phase.
If a territory contains more than 2 different players (nations), then only the units owned by the current player are considered to be “attacking”. Any units which are enemies of the current player are considered to be “defending” (including all air units on carriers). In this way, many nations may defend, but only one nation may attack during each turn. Multinational attacks are not possible in most maps.
Each battle proceeds in a series of rounds, until at least one side is destroyed or retreats. The attacker may retreat at the end of any round. Both defending and attacking subs (stealth units) may retreat (submerge) at the end of any round if no enemy destroyers are present (in some maps, submarines may retreat before the battle starts as well).
Each combat round proceeds in a series of segments. Unless otherwise specified, all units of both attacker and defender get to fire once per battle round, even if the unit is selected to be a casualty. The segments of battle are as follows:
- First, attacking subs (stealth units) fire, and the defender allocates the casualties. If the defender has no anti-stealth units (destroyers) present, the non-submarine casualties are removed immediately and do not participate further in this combat.
- Next, defending subs fire using the equivalent procedure. If the attacker has no destroyers present, the casualties are removed immediately and do not participate further in this battle.
- Next, any remaining attacking units fire, and the defender allocates the casualties.
- Next, any remaining defending units fire using the equivalent procedure, and the attacker allocates casualties.
- Allocated casualties are now removed from the game. If one side has no more units, then the other side wins (and if the attacker wins, they conquer the territory).
- If the defender has any submarines, they may choose to submerge them now. The attacker may then choose to submerge their submarines.
- The attacker then chooses whether to retreat, or press on. If the attacker retreats, then all non-air units must move to a single territory where at least one non-air unit originated from. The air units will stay in this battle territory and must be moved during the non-combat movement phase. If the attacker presses on, then the battle continues with a new combat round.
How Units “Fire” at the enemy:
Each unit in the game has a certain attack power and defense power (for example, infantry have 1 attack and 2 defense). This means that during battle, their owner will roll 1 die for each infantry they have. If the infantry are attacking, then the owner will score 1 “hit” for each die that shows a “1”. If the infantry are defending, then the owner will score 1 “hit” for each die that shows a “2” or less (“1” or “2”). This is called “rolling at 2”.
So for example, if you had 3 infantry and 1 tank defending, you would roll “3 at 2, and 1 at 3”, because you have 3 infantry defending ‘at’ 2, and 1 tank defending ‘at’ 3.
For each “hit” scored, the enemy must allocate 1 casualty.
Special Cases: Subs cannot inflict casualties on air units, ever. On some maps, air units cannot hit submarines unless a destroyer is present in battle (in Big World, air units can hit submarines without a destroyer present). Some units, such as battleships, are so large that it takes two hits to destroy them. The first hit only damages them. The damage has no effect on the unit’s firepower or stats. Damaged battleships are automatically repaired at no cost at the end of the player turn. Any land units being carried by transports do not fire, or participate in combat in any way. Likewise, allied fighters on attacking carriers will not participate. This means they do not fire, and may not be selected as casualties. It is important to note that, excluding the exceptions listed above, all units may hit all other units. This is because TripleA is a grand strategy game engine, and therefore a single unit actually represents an army, fleet, or air command. Each round represents 3-6 months of time, and all engagement and combat over that time.
Amphibious Combat
Land units may unload from transports into a battle. Combat is resolved normally, with a few exceptions:
- If there is a combat in the sea zone from which the invasion came, that combat must be resolved before the combat including the invasion. The attacker must win the sea combat, and the relevant transports must survive. If transports sink, the land units being transported will die with them, and therefore not participate in the amphibious battle.
- Each attacking unit with bombardment ability (battleships) in the same sea zone as the invading transports may use its firepower in a special one-shot “bombardment”, as long as it did not participate in any combat this turn. If the battleship rolls its firepower or less on one 6-sided die, and hits, then the defender must immediately remove one unit from the defending force. The bombardment casualty does not get to return fire. (In some maps, you may not have more bombardment rolls than the total number of amphibious attackers, and in addition, the bombardment casualty will get to fire during the first combat round, before dying.)
- The invading amphibious units may not retreat.

In the Non-Combat Movement Phase, the current player may move any or all of his units to the full limit of their remaining movement allowance, with certain exceptions.
- Air units must “land” in this phase. This means that they must end this phase in a territory that was controlled by the current player or an ally at the beginning of this player’s turn, or (for fighters only) in a sea zone containing an eligible friendly or allied carrier.
- Air units may not commit suicide or be dashed into the ocean. If still alive after the battle phase, all fighters must return to friendly land or move to carriers, or carriers must move to pick them up. Carriers have limited space, and may not be filled beyond capacity (in Big World and most other maps, Carriers have space for 2 fighters).
- Land and sea units that participated in any form of combat in this player turn may not move in this phase. Transports that unloaded this turn may not make any further movement.
- Units moving in this phase may not initiate any form of combat, including blitzing. That is, land and sea units may not enter any territory controlled by an enemy or neutral, or any sea zone containing an enemy or neutral unit.
Certain units, such as AA units, may move only in this phase, unless they are cargo in transports. Transport rules still apply, and units can be loaded and unloaded in either combat or non-combat movement phases.

In the Placement Phase, units that were bought during the purchase phase at the beginning of this turn may be placed on the map.
Any newly purchased factories can be placed in any territory that was owned by the current player at the beginning of the turn. These new factories may not begin producing units until the next turn.
Generally, land and air units can only be placed in owned territories containing factories that were owned at the beginning of the turn.
Sea units can only be placed in sea zones that are adjacent to factories owned at the beginning of the turn. If purchasing one or more Carrier units and 1-2 Fighter units per Carrier, then the Fighter units may be placed on the Carrier in the sea zone. In addition, when placing a new Carrier unit, you may move up to 2 Fighters from the adjacent factory-holding land territory, to the new Carrier unit. (However, in some maps you may not make this ‘free’ movement, and instead must move the Fighters there during the non-combat movement. In these maps you may also place new Fighter units on already existing adjacent Carriers.) The maximum number of units placed at a factory in one player turn is equal to the production value of that territory. This includes sea units built in adjacent territories.
It is possible to place new units into sea zones controlled by an opposing player. This does not require combat resolution unless the situation persists until the end of the enemy’s next movement phase.
The exact procedure for placing new units is to left-click on an eligible territory or sea zone. At this point, a menu listing units available for placement there will appear. These menus may be closed and restored multiple times during the Placement Phase and changes can be made freely, all without penalty. After all available units have been placed, these menus will no longer appear, although “undo” is still available. Unit placements are listed on the right as they are made, and the placements can be undone at any time.
In a situation where several factories are adjacent to one sea zone, and a mix of land, air, and sea units are to be placed by each factory, the TripleA engine may not always calculate correctly which factory you wish to use to place the sea units. In this case, the land and air units should be placed first.
When all available units have been placed to the player’s satisfaction, he can manually terminate the Placement Phase by pressing “Done” on the right side of the screen. While there is usually no good reason to do so, a player is not forced to place all units before terminating this phase. Any units that were not placed are removed from the game (in some maps, the units may be retained and placed during the player’s next turn).
Newly placed units are fully functional at the end of this phase, meaning that they can be used for defending if attacked during the next player’s turn.

In the End Turn Phase, TripleA will automatically do all of the following actions, with no input required by the user.
- Activate any technologies that were successfully researched during the Tech Development phase.
- Count all of the income from owned territories and give that income to the current player.
- If the map includes any bonuses for capturing certain objectives, these bonuses will be checked for and given out now. (As an example, a map may give an additional X pu’s for controlling a strategic territory, such as Egypt.)
- In addition, any other end-of-turn effects occur. If a map has anything extra, it will list it in the Game Notes.
At the end of this phase, the next player may start their turn.

Normally “Victory” is determined by one player surrendering the game once they believe it is impossible for them to win. However, most maps, including “Big World” include default ‘victory conditions’, which the players can play too if no surrender is forthcoming. Normally victory is determined by controlling a certain number of strategically important territories, called “Victory Cities” (VCs), which are indicated on the map by small yellow stars. Depending on which victory condition is chosen during game setup, victory in “Big World” occurs when one side controls 14-17 victory territories (the default is 17).

The Victory Condition is normally tested at the end of every round.
Victory City marker: 

TripleA is a turn-based strategy game. Generally, this means that a player can spend as much time as he wants on any aspect of his move, and can freely change anything he does during the turn without penalty, until he manually ends a phase.
There are no time limits, though human players will generally appreciate faster play.
Live games, played on the lobby, network, or on the same computer (hot-seat), are generally played faster. Play-By-Email (PBEM) and Play-By-Forum games allow for much more time to consider and reconsider all actions.

TripleA is a dice game, and as such there is a significant amount of luck present in each battle (though it will tend to even out over a long game, or series of games).
Since many players disdain the uncertainty created by the high variability of dice, we have created a system called “Low Luck” (LL).
In “Normal Dice”, one die is rolled for each unit participating in a battle.
In “Low Luck”, all of the attacker’s units have their attack powers added together. The total is then divided by the dice sides (6), and if there is any remainder it is rolled for. The defender does the same with the defense powers of all their units.
As an example, consider Germany using 4 armour to attack Russia, which is defending with 2 infantry plus 1 armour.
Round 1 of Battle:
Germany will take the attack power of each of her units and add them together. The total is 12 attack power (4 x 3). 21
This is then divided by 6, giving us 2 hits, and zero remainder. Russia now selects 2 units to be allocated as casualties, and chooses her two infantry.
Now it is Russia’s turn to fire. The total for her is 7 defense power (2x2 + 1x3). This is then divided by 6, giving us 1 hit, and 1 remainder. Russia now rolls 1 die at 1, to see if she gets 1 more hit. We will pretend she misses for this example. Germany now selects one of his armour to be a casualty.
Both sides now remove their casualties. Germany has 3 armour left, and Russia has only 1 armour left. Germany may now decide to retreat or keep fighting.

What is the expected outcome of this battle? How likely is it? These are questions that TripleA players, and wargamers in general, ask a lot, or at least they should. Specifically, consider a turn 1 Russian attack into Finland in Big World.
In Finland, Germany has 2 infantry, each defending at 2. The obvious starting point for this battle is Russia’s 3 infantry in Karelija. What are the chances of winning? How many more attack units should Russia add in order to win? There are 2 armour units nearby that could be used. If these are added, then the Russians have 9 total attacking power and 5 units (five hitpoints), while the Germans have 4 defending power and 2 units. This is obviously overkill, but can we be more scientific?
Assuming that Low Luck (LL) rules are in effect, the Russians will kill 1.5 units on round 1, and will probably lose one infantry. On round 2, if it happens, the Russians might lose a second infantry. Overall, the Russians will lose about one infantry but no more than two. Exact analysis shows that the Germans will get zero hits 5 times out of 18, one hit 11 times out of 18, and 2 hits 2 times out of 18. On average, the Germans will kill 5/6 of a Russian infantry on the first round, and possibly more if Russian’s miss their shots and the battle goes multiple rounds, so on average the Russians expect to have approximately 4 units remaining.
This calculation is relatively simple, but what if more units are involved? Fortunately, TripleA provides a handy utility called the Battle Calculator. It can be accessed through the Game menu, the Territory tab, or by hitting CTRL and “B” at the same time while your mouse is over the desired territory. It allows the player to calculate the expected outcome for any possible battle within the game, by simulating the battle occurring multiple times. If you use the CTRL-B shortcut while your mouse is over a territory containing a battle, then the battle calculator will automatically load the units in the battle.

When a game is running, several menu options are available at the upper left of the screen, as well as three or more tabs just below the minimap on the right side. Most of the menu options are either fairly unimportant or quite obvious in what they do. The most important non-obvious ones are described below:
- “Help -> Game Notes”. The ‘game notes’ are specific notes made by the person who made the map or mod you are currently playing. These notes often describe specific rules that this game variant follows, what each unit does, and any other things that the map maker thought important for you to know. It is definitely a good idea to read these before playing a map!
- “Game -> History”. By going to the ‘game history’ you can go back in time through all the steps to see each action that was taken by all players. By clicking on a specific round or step or action, the main screen will adjust to look just like the game looked like at the time when that action took place.
- “Game -> Edit Mode”. Edit mode allows you to perform actions that are normally illegal, or to adjust the game board in any way (like adding extra units, or deleting units, etc). The actions are recorded in the game history though.
- “View -> Show Map Details”. Map Details normally defaults to “true” when a map has them. Map Details (also called “reliefs”) is art that is shown on the game board. While normally visually pleasing, sometimes this art can cover up features you want to see, or make it hard to see who owns what territory. To view a map without art, and just see bare political boundaries, turn Map Details off.
- “View -> Map Skins”. Some maps come with multiple sets of art. You can switch between these art sets by selecting a different map skin here.
Tabs:
If the Actions tab is selected, then a list of all actions that have been ordered for the current phase is presented, and buttons are available to permit easy modifications. This can be considered the “default” tab.
If the Stats tab is selected, then important game information such as the income for each player, how many units each one has, and what technologies have been developed are listed. The players are listed in turn sequence.
If the Territory tab is selected, then moving the cursor over the map causes the contents and names of the map areas to be displayed below the minimap. (The names of the map areas and production values are displayed at the lower left of the main map widow at all times.) This can be very useful, especially for densely occupied maps where it can otherwise be hard to determine exactly what is going on in a given map territory. The Battle Calculator can also be accessed through this tab, but a player will rapidly learn that it is better to know the keyboard shortcut.